
Every time you open your browser, type a URL, and hit Enter, a complex series of events unfolds in milliseconds — connecting devices across the globe, fetching data, and displaying a fully interactive web page. This invisible process happens billions of times a day, yet few people understand what’s really going on behind the scenes.
In this article, we’ll break down exactly how the web works — from the moment you send a request to when your browser renders the final page — in clear, technical, and practical terms. By the end, you’ll understand not just what happens, but why it happens, and how web developers use this knowledge to build efficient, secure, and lightning-fast websites.
1. What Is the Web?
The World Wide Web is a vast network of interconnected computers that communicate using standardized protocols. At its core, the web is built upon three foundational technologies introduced by Tim Berners-Lee in 1989:
- HTML (HyperText Markup Language): The language used to structure web pages.
- HTTP (HyperText Transfer Protocol): The communication protocol that defines how clients (browsers) and servers exchange information.
- URL (Uniform Resource Locator): The address system that identifies each resource on the web.
In essence, the web is a client-server system. You (the client) request a resource (like a web page) from a server, which processes the request and sends a response back to your browser.
2. Step One: Entering a URL and DNS Resolution
When you type a website address — for example, https://www.example.com — and press Enter, your browser begins by trying to find out where that website lives.
However, computers don’t communicate using words like example.com; they use IP addresses, such as 192.0.2.1. To convert the human-readable domain into an IP address, your computer uses the Domain Name System (DNS).
How DNS Works
- Browser Cache Check: The browser first checks if it already knows the IP address from a previous visit.
- Operating System Cache: If not in the browser cache, it checks your local OS cache.
- Router and ISP DNS Server: If still unresolved, the request is sent to your Internet Service Provider (ISP)’s DNS server.
- Recursive Lookup: If your ISP’s server doesn’t have the answer, it queries other DNS servers up the chain until it reaches the authoritative server for the domain.
Finally, your browser receives the corresponding IP address — e.g., 93.184.216.34 — allowing it to connect directly to the target server.
🧠 Fun Fact: DNS is often called the “phonebook of the internet.” Without it, you’d have to memorize hundreds of numerical IP addresses.
3. Step Two: Establishing a Connection (TCP/IP and HTTPS)
Now that the browser knows the server’s IP address, it needs to establish a connection.
This happens through the Transmission Control Protocol (TCP) — part of the TCP/IP suite, the foundation of internet communication.
The TCP Handshake
- SYN: The client (browser) sends a “synchronize” request to the server.
- SYN-ACK: The server acknowledges and responds with its own synchronization request.
- ACK: The client confirms receipt, and the connection is established.
At this point, data can flow between client and server in both directions.
Securing the Connection: HTTPS and TLS
Modern websites use HTTPS, which adds an extra layer of encryption via TLS (Transport Layer Security).
This ensures:
- Data integrity (no tampering)
- Authentication (you’re communicating with the real site)
- Confidentiality (data is encrypted)
So, before any real data exchange, your browser and the server perform a TLS handshake to agree on encryption keys and verify security certificates.
4. Step Three: Sending the HTTP Request
Once the connection is established, your browser sends an HTTP request to the server.
A typical HTTP request includes:
- Request line: Method (e.g.,
GETorPOST) and target resource (/index.html) - Headers: Metadata like browser type, cookies, and accepted formats
- Body (optional): Data sent to the server, usually with POST requests
Example:
This simple text-based message tells the server what resource your browser wants.
5. Step Four: The Server Receives and Processes the Request
When the server receives the request, it must decide how to respond. This process varies depending on the type of website:
Static Websites
For static sites (e.g., those built with HTML and CSS only), the server simply retrieves the requested file from its storage and sends it back to the browser.
Dynamic Websites
Dynamic sites (like e-commerce platforms, social networks, or dashboards) involve more steps:
- The server routes the request to an application (built with Node.js, Python, PHP, etc.).
- The application may query a database for user-specific data.
- The application generates a customized HTML response on the fly.
- The server sends this response back to the browser.
Example:
If you visit your profile page, the server fetches your user data from a database and dynamically inserts it into the HTML template before sending it.
6. Step Five: Receiving the HTTP Response
Once the server finishes processing, it sends back an HTTP response.
A typical response contains:
- Status line: e.g.,
HTTP/1.1 200 OK - Headers: Information like
Content-Type,Cache-Control, orSet-Cookie - Body: The actual content — usually HTML, JSON, or other data
Example:
The status code is especially important:
- 200 OK: Success
- 301/302: Redirect
- 404: Not Found
- 500: Server Error
Your browser uses these codes to decide what to do next.
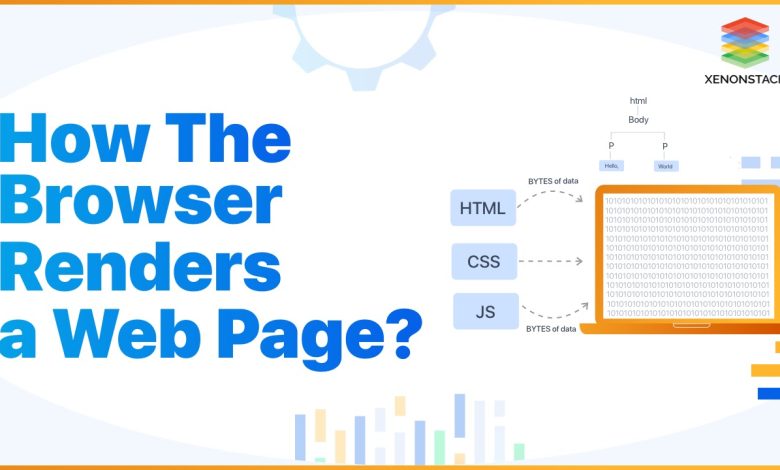
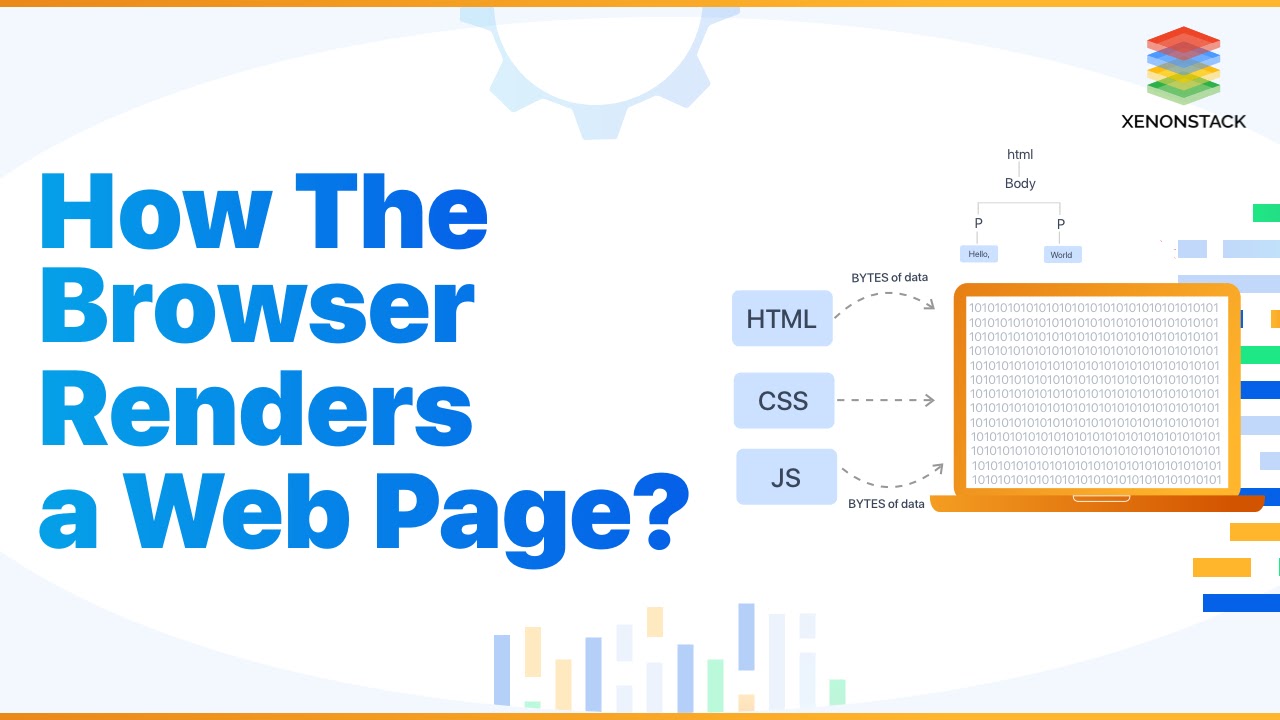
7. Step Six: Browser Rendering – Turning Code into Pixels
Once the HTML arrives, your browser begins the process of rendering the web page. This is where the magic happens — converting raw code into an interactive visual interface.
Let’s go step by step.
1. Parsing HTML and Building the DOM
The browser reads the HTML document line by line, creating a Document Object Model (DOM) — a tree-like structure representing every element on the page (divs, paragraphs, images, etc.).
2. Loading CSS and Constructing the CSSOM
As the browser encounters <link> or <style> tags, it fetches and parses CSS files, building the CSS Object Model (CSSOM).
This defines how each element should look — its colors, fonts, margins, and layout.
3. Combining DOM and CSSOM → Render Tree
The browser combines the DOM and CSSOM into a Render Tree, which represents what will actually be displayed on the screen.
4. Layout (Reflow)
The browser calculates the position and size of every visible element. This stage is called layout or reflow.
5. Painting and Compositing
Finally, the browser paints pixels on the screen, layer by layer. Modern browsers use GPU acceleration for smoother animations and transitions.
⚡ Pro Tip:
Efficient CSS and minimal DOM manipulation help speed up rendering and reduce “reflows,” which can otherwise slow down performance.
8. Step Seven: Loading Additional Resources
As the page renders, the browser encounters references to external resources, such as:
-
Images (
.jpg,.png,.webp) - JavaScript files (
.js) - Fonts
- APIs or data fetched asynchronously
These resources are fetched via additional HTTP requests, often in parallel.
Modern browsers use asynchronous loading and lazy loading to prioritize what’s needed first (e.g., visible content) and defer what can wait.
9. Step Eight: Executing JavaScript
Once the main HTML and CSS are processed, the browser executes any linked or inline JavaScript code.
JavaScript controls interactivity — animations, form submissions, dynamic data updates, and more.
How Browsers Execute JavaScript
- The JavaScript engine (e.g., V8 in Chrome) parses and compiles JS into machine code.
- The script is executed in the browser’s single-threaded event loop.
- If a script modifies the DOM, the browser may re-render part of the page.
🧩 Frameworks like React, Vue, and Svelte use “virtual DOMs” to minimize costly re-renders and improve performance.
10. Step Nine: Handling User Interaction and Subsequent Requests
Once the page is loaded, the interaction doesn’t stop. When you click buttons, fill forms, or scroll, JavaScript may send AJAX or fetch requests to retrieve new data without reloading the page.
This dynamic behavior is what makes modern web apps feel fast and responsive — data updates seamlessly, while the page structure stays intact.
Example:
When you “like” a post on social media, your browser sends a small asynchronous request to the server, which updates the database and instantly reflects the change in your UI.
11. Step Ten: Caching, Cookies, and Performance Optimization
To avoid repeating this complex process every time, browsers and servers use caching mechanisms.
Browser Cache
Stores static assets like images and stylesheets locally, so they don’t need to be downloaded again.
CDNs (Content Delivery Networks)
CDNs store copies of website files across multiple geographic locations, ensuring users always connect to the nearest server for faster load times.
Cookies and Local Storage
Used to store session data, user preferences, or authentication tokens for smoother user experiences.
Tip: As a developer, setting correct cache-control headers and minimizing HTTP requests are key for fast-loading websites.
12. The Full Cycle (Simplified Overview)
- You type a URL.
- The browser resolves the domain via DNS.
- A secure TCP/TLS connection is established.
- The browser sends an HTTP request.
- The server processes it and sends a response.
- The browser parses, renders, and executes resources.
- You interact — and new requests are made dynamically.
All this happens within fractions of a second, making the web one of humanity’s most sophisticated communication systems.
Conclusion
Understanding how the web works under the hood isn’t just theoretical — it’s essential for becoming a skilled web developer. Knowing what happens between typing a URL and seeing a rendered page helps you write faster, more secure, and more reliable code.
From DNS lookups and TCP handshakes to rendering pipelines and JavaScript execution, each step is an opportunity to optimize and improve user experience.
The more you understand these layers, the more control you gain over the performance, security, and scalability of your web applications.
So next time you hit Enter on a URL, remember — in that instant, hundreds of processes, protocols, and optimizations are working together to bring the modern web to life.